The Compost Heap
News, Views, and Features from the Posh Squash Garden
The Sea Ranch, California
Late Spring 2002, Issue #2
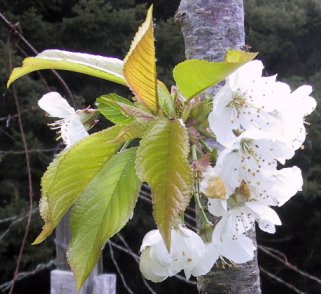
Hare in the Garden!
Live long and well, hare,
But! No plant, no pick here.
--by Chester Case
Cold months, no rain
Still, in silence eternal
First sprouts spring forth.
--by Gerry Wilson
The 12-Step Approach to Bed Prep
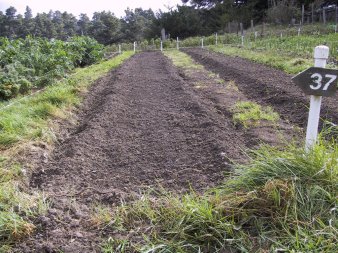
Seventy-eight rows grace our Garden. Except for eight or so rows and beds planted in perennial crops -- berries, asparagus, artichokes -- all need to be prepared. And prepared again and again through the season, as crops mature and we replant.
Here is a Twelve-Step Program written for us by Mary and Jim Alinder. They are the row prep experts. They pass on what gardeners have learned is needed to get the rows ready for thriving plants. Our soil conditions, climate and watering require careful attention to preparation.
Row prepping has paid off. Imagine the rocky, unpromising soil the gardeners took to twenty-eight years ago. Rocks, rocks, rocks and very little humus. The tilth, the rich, dark soil we now offer our plants, is the result of the amendments, tilling, care and nuture.
You can check out the cross sectional schematic of the ideally prepared row in the front of the Planting Book.
Chester Case, Editor-in-Chief
1. Pull out big weeds and cut back tall grasses along side of row. Deposit in weed pile.
2. Run rototiller once up the middle and then down one side and then down the other, about six inches wider than the row edges, breaking up the soil where the sides will be dug. It will make the digging much easier.
3. Use a shovel (or, if you are super-strong, the deep-fork) to dig deeply and turn over row to lessen the chance of a hard pan forming from our continued rototiller use.
4. String row, tying string the length of both sides between white pipes and about 2 feet above the ground. Tie simply so that you can easily untie it again.
5. Amend row with: a. 3 or 4 wheelbarrows of compost. Check on blackboard in shed for which bins are ready. b. 5 pounds of lime (small plastic bucket) found in white wooden storage shed. c. use same small plastic bucket to measure and then disperse organic fertilizer pellets found in white storage shed. d. use same small plastic bucket for diatomaceous earth [DE]. DE is very finely ground shell, found in white storage shed. It is hazardous to breathe. Do not work with this if you have a history of lung problems, or if you simply don’t want to. When dealing with it, wear a mask at all times. While placing it on the row, bend close to the earth and make sure that no one unmasked is nearby or directly wind.
6. (optional) You may want to rototill in the amendments at this point if the row will be planted to a deeper-rooted crop, e.g. carrots.
7. Dig sides. Place shovel directly under string to make a trench on either side of the row. Shovel dirt on top of amendments. Use the shovel to chop up large clumps.
8. Remove strings. Roll them up on a stake of wood; it makes re-using it so much easier.
9. It seems essential to have three people on this step: one person at the controls of the rototiller and the other two placed at either front side, holding on to the rototiller, walking along with it to control its movements, always maintaining its position along the top of the bed. Do not allow the rototiller to plunge into the newly dug trench. Carefully run rototiller: a. down the middle of the row; b. down one side; c. down the other side; d. final pass down the middle.
10. Bless the row. Lay the white and green plastic pipe/row measurer across the row, using it as your guide to the prescribed width of the row top, which is the entire portion painted green. Rake the row to that width, making the surface as flat as possible, not sloping with the natural fall of the hillside. Remove rocks and other unwanted material as you go. Form small walls of dirt on the sides to help hold water in the row unless the row will be planted with plants needing “saucers” of dirt e.g. squash.
11. Fetch the two garden books: the daybook and the row book. Enter what you have accomplished in BOTH books.
12. Stagger home. Take two Advil. Soak in a tub. Fall into bed for a nap.
![]()
Help Wanted: Posh Squash Giant Scrapbook
The big (20" X 25") scrapbook is our best single source of historical materials. It is a treasury of photos, letters, clippings, announcements and flyers. It was lovingly kept for years, but has lapsed for several years now. We need someone(s) to organize and install the material from recent years. Contact Chester if you have an archival itch.
The Garden has plenty of money, but hey, it is only the beginning of the season. Experience shows we will spend our balance down more quickly now, with water the single largest expense. The Garden is supported entirely by Gardeners' annual dues, our own sweat and toil, and occasional Gardener contributions of equipment, supplies and the like. Treasurer Iris Borg keeps track of Garden expenses, writes checks, and collects dues. The Steering Committee must authorize expenditures for any project or expense other than routine.
Here are highlghts of the report Iris brought to the Steering Committee meeting, May 23, 2002 for the period December 31, 2001 to May 1, 2002:
Carryover balance from 2001 $1,989
Total dues collected for 2002 5,450
Expenses to date 1,893
Balance $5,546
You can get an idea of the lean, keen, keeping-green spending habits of the Garden by a look at the categories and cost to date:
water $276
supplies 231
seeds 218
fertilizer 233
bank charge 14
equipment 97
services 30
copying/
newsletter 20
building
materials 714
greenhouse 53

The Posh Squash Steering Committee met May 23, 2002 to take on a packed agenda. Present were: Mary Austin, Tom and Linda Warnock, Sally and Jer Skibbins, Iris Borg, Jim Grenwelge, John Horn, Dianne Rasmussen, Ben Klagenberg, Ken Holmes and Chester Case.
“Fabulous germination in the greenhouse,” reported Jer. Overall the Garden is doing well, but cold weather, quail and insects have slowed growth. Planting plans were reviewed; coming soon, if not already in, are squashes, cucumbers, tomatoes, chard, kohlrabi and another try at spinach. Cucumbers will come out of the tent and into one-gallon cans. In-ground germination has been poor for the past two years, so more will be started in the greenhouses. This is only the beginning, as the Garden proliferates, A (asparagus) to Z (zucchini).
The matter of an alternative site for the Garden on the Ranch was discussed, and it was decided to renew our negotiations with TSRA.
The Steering Committee wishes to bring to the attention of Gardeners:
· Refrain from “creative” planting. Plant only the plants in the rows intended for them. Strange things happen when somehow zucchini ends up too close to squashes. Check the Planting Book; don’t freelance.
· Planting from seeds: For a refresher or an intro to the “Posh Squash Way,” check out the Planting Book for details. Briefly, rake, groove, sow, cover, press down, water. String lines of twine to guide your sowing, and leave the lines up to guide waterers and weeders. Plant far enough in from the edges of the row for effective watering, and plant at least a foot in from the ends. (An upcoming Compost Heap will have articles on the all-important techniques of watering and planting.)
You’ve got to love the Garden and its ways. A Committee member observed that last year the beans all seemed to come in at the same time and some went to waste. What can we do about that? “Well,” another member smiled, “Last year we staggered the plantings to prevent that, but as it happens, cold weather slowed the first planting, and warm weather accelerated the second, so they both came in about the same time.”
The Gardener Proposes, Mother Nature Disposes.
If you have questions about the watering schedule, or can't remember what you signed up for, or have traded shifts with anyone, please call Watering Guru Jeanne Holmes at 785.3889.
by Reva Basch
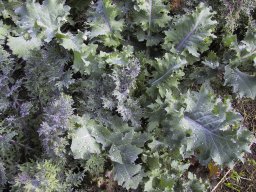
My friend David grew up with a mother whose enthusiasm for gardening resulted in her planting way more kale than her family could comfortably consume. As a result, the thought of eating cooked greens in any form is enough to impel David in the direction of the nearest McDonald’s. Too bad. Kale is a great green, much appreciated in parts of Europe and the U.S. It winters over beautifully; in fact, kale is reputed to taste sweeter after a touch of frost.
Try this recipe for Caldo Verde, a Portuguese potato and kale soup, adapted from the new Joy of Cooking. I may even try it on David next time he visits:
In a large soup pot, heat 2 Tbsp oil over medium-low heat. Add 1 medium onion, chopped, and 2 cloves garlic, minced. Cook, stirring, 5 to 10 minutes, til tender but not browned.
Stir in 8 cups water or chicken stock, or a mixture of the two. Add 4 medium potatoes (peeled, if you prefer), 1-1/2 tsp salt or to taste, 1/2 tsp ground black pepper.
Bring to a boil, reduce heat, and simmer until potatos are soft, about 20 minutes. Remove pot from the heat and lightly mash the potatos, right in the pot, using a potato masher.
Add 6 ounces or so spicy sausage, thinly sliced and browned in a skillet. (Portuguese linguiça is authentic, but chorizo, Louisiana links, or Aidell's spicy sausage work fine.) Pour a cup or so of the soup into the skillet, scrape up the brown bits and return them and the liquid to the pot.
Simmer for 5 minutes, then stir in 4 cups shredded kale (you can also use chard) and simmer another 5 minutes. Stir in 2 Tbsp lemon juice, ladle into bowls and enjoy! (Makes about 10 cups)

Photos by Reva Basch